Note: This article is written in a natural craft-blog style and is based on real polymer clay safety, baking, jewelry-making, and panda-reference information from reputable art-material, craft, jewelry, and wildlife sources. Polymer clay is an oven-cured modeling material that stays workable until baked, and many popular brands publish specific curing instructions for time, temperature, ventilation, and handling.
A Tiny Panda, a Big Milestone, and One Very Dramatic Ball of Clay
There is something wildly satisfying about reaching a one-month milestone and celebrating it with a handmade object small enough to dangle from a keychain. Some people buy cake. Some people post a selfie. Some people reorganize their entire desk and call it personal growth. I, apparently, roll a few blobs of polymer clay into a panda charm and behave like I have just opened a boutique sculpture studio in Paris.
But honestly? A polymer clay panda charm is the perfect “one month here” project. It is cute, personal, beginner-friendly, and forgiving enough that even if one ear comes out slightly larger than the other, you can simply call it “character.” That is the beauty of handmade crafts: tiny imperfections become personality, and personality is basically free branding.
This panda charm project combines several things people love about polymer clay charms: miniature sculpting, kawaii-style design, simple color blocking, jewelry-making potential, and the joy of turning a soft little lump into something durable enough to live on a bag, zipper pull, charm bracelet, phone strap, or display shelf. Polymer clay is especially popular for small decorative pieces because it can be shaped before curing and hardened in a home oven when handled according to the manufacturer’s instructions.
Why a Panda Charm Works So Well in Polymer Clay
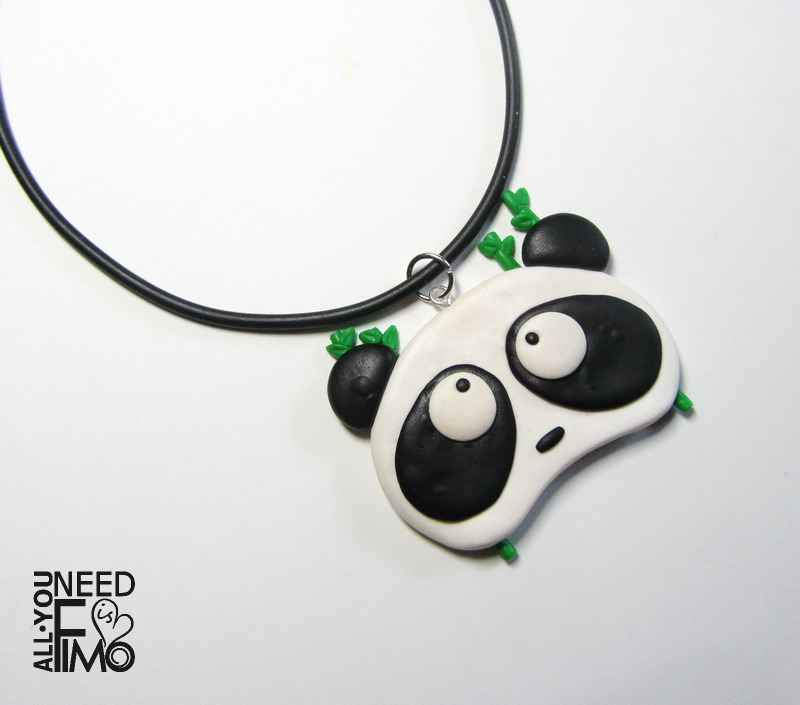
Pandas are almost unfairly designed for charm-making. Their round faces, black-and-white markings, soft ears, sleepy eyes, and general “I would like bamboo and emotional support” energy translate beautifully into miniature clay art. A panda does not require complicated color blending, advanced anatomy, or a sculpting degree from the University of Tiny Things. You mostly need white clay, black clay, patience, and the ability to resist squishing the face while attaching the ears.
Real giant pandas are known for their distinctive black-and-white coats, powerful jaws for eating bamboo, and specialized wrist bones that help them grip stalks almost like thumbs. They live mainly in mountainous bamboo forests in China and spend huge amounts of time eating bamboo, which makes the bamboo detail a charming extra for a handmade panda design.
For a handmade charm, those real-life panda features can become simple design cues: round white head, black ears, black eye patches, tiny nose, soft paws, and maybe a miniature bamboo shoot. The final result looks instantly recognizable, even at a small size. That matters for SEO-friendly craft content too, because readers looking for “polymer clay panda charm,” “cute clay charm ideas,” or “beginner polymer clay animals” want a project that feels achievable, not like a tiny taxidermy exam.
Materials You Need for a Polymer Clay Panda Charm
The best part about this project is that the supply list is not scary. You do not need a studio full of mysterious tools that look like they belong to a dentist who moonlights as a fairy-garden architect. A few basic polymer clay supplies can take you surprisingly far.
Basic Supplies
You will need white polymer clay for the panda’s head and body, black polymer clay for the ears, arms, legs, and eye patches, and a tiny bit of green clay if you want to add bamboo. A clean work surface, a craft blade, a toothpick or dotting tool, parchment paper, an oven-safe tray, and an eye pin or small jewelry finding are also useful. Jewelry suppliers often recommend findings such as jump rings, eyelets, tubes, or embedded wire when turning clay pieces into wearable or attachable charms.
Optional Finishing Supplies
After baking, you may want fine sandpaper, acrylic paint for facial details, glaze, UV resin, or a small brush. These are optional, not mandatory. A matte panda looks soft and handmade, while a glossy panda looks like it is ready for a close-up and possibly a tiny agent.
Step-by-Step: How to Make the Panda Charm
Step 1: Condition the Clay
Before shaping anything, condition your polymer clay by kneading it until it becomes smooth and flexible. This step matters because stiff clay can crack, crumble, or refuse to cooperate like a cat near bathwater. Warm hands, gentle rolling, and repeated folding help soften the clay and make it easier to shape.
Step 2: Make the Panda Body
Roll a small ball of white clay for the body. Flatten it slightly if you want a chubby sitting panda shape. A charm should not be too thick or heavy, especially if it will hang from a bracelet or keychain, so aim for cute and compact rather than “panda paperweight.”
Step 3: Shape the Head
Roll a second white ball for the head and gently press it onto the body. If the charm will be handled often, you can strengthen the join by adding a small amount of liquid polymer clay between the pieces or by lightly blending the seam with a tool. The head should be round, slightly larger than the body, and adorable enough to make you pause for a moment and whisper, “Oh no, I love him.”
Step 4: Add Ears, Arms, and Feet
Use black clay to create two small ears, two arms, and two feet. Roll each piece evenly, then press gently into place. The trick is to attach firmly without flattening the whole panda into a pancake. If your fingers keep leaving prints, try using a silicone tool, a small piece of parchment, or very light pressure.
Step 5: Create the Panda Face
The face is where the charm comes alive. Add two flattened black ovals for eye patches, then place tiny black dots or painted details for the eyes. Add a small black nose and a subtle mouth using a toothpick. Keep the expression simple. A tiny smile, sleepy eyes, or surprised dot-eyes can all work. The panda should look like it has just discovered snacks, not like it is questioning the meaning of existence.
Step 6: Add a Bamboo Detail
A tiny bamboo stalk is optional, but it adds storytelling. Roll a thin green cylinder, score small lines along it, and attach a few miniature leaves. Since giant pandas are famously bamboo-focused, the detail instantly makes the charm feel more complete. Pandas may eat bamboo for many hours a day, and several wildlife sources describe bamboo as the center of their diet and daily behavior.
Step 7: Insert the Eye Pin
If the panda will become a charm, insert an eye pin into the top before baking. Push it deep enough to hold securely, but not so far that it pops through the panda’s face like a very unfortunate craft accident. For extra durability, some makers remove the eye pin after baking, add strong adhesive, and reinsert it once the piece is cool.
Baking the Panda Charm Without Panic
Baking is the moment when many beginners stare at the oven like they are waiting for a medical diagnosis. The good news is that polymer clay is designed to cure with heat. The important part is following the package directions for your specific clay brand, using the correct temperature, and avoiding scorching. Sculpey’s general guidance for many of its clays is 275°F, or 130°C, for 15 to 30 minutes per 1/4 inch of thickness, while also recommending preheating and careful timing.
An oven thermometer is a smart tool because home ovens can run hotter or cooler than the dial claims. Sculpey also recommends parchment or card stock under pieces to help prevent darkening, and a paper or cardboard tent can protect small or thin clay pieces from scorching.
Once baked, let the panda cool completely before touching, sanding, painting, or glazing. Freshly cured clay can still feel slightly flexible while warm, and moving it too soon may bend delicate details. Cooling is not glamorous, but neither is accidentally smudging the face of a panda you just emotionally adopted.
Safety Tips for Polymer Clay Beginners
Polymer clay is widely used for home crafting, jewelry, miniatures, ornaments, and decorative accessories. Many Sculpey clays are AP-certified non-toxic, and ACMI explains that polymer clays in its program have been evaluated and found non-toxic when used as directed. Still, makers should not overbake clay, should use good ventilation, and should follow package instructions carefully.
Do not microwave polymer clay. Do not guess the baking temperature. Do not use raw clay on food-prep surfaces unless those surfaces are protected. And please do not make polymer clay mugs, plates, or utensils for direct food contact just because the panda turned out cute and now you feel unstoppable. Sculpey notes that even non-toxic clay and glazes are not recommended for surfaces used to eat or drink from.
Design Ideas to Make the Panda Charm More Personal
Turn It Into a Keychain
A panda keychain is practical, visible, and a great way to show off your one-month milestone. Add a sturdy jump ring and keychain hardware after baking. If the panda is going on keys, consider sealing painted details so they do not rub away in the wild jungle known as “the bottom of a bag.”
Make It a Phone Charm or Bag Charm
A smaller, lighter panda works well as a phone charm, zipper charm, or backpack decoration. Keep the limbs close to the body so they are less likely to catch on fabric. This is one of those moments where cuteness and engineering shake hands politely.
Add a Date or Initial
Because the title celebrates being “1 month here,” add a tiny date, initial, or number one on the back. This turns the charm from a cute craft into a memory marker. A month may seem small, but creative milestones matter. Every artist starts somewhere, usually surrounded by crumbs of clay and one missing tool that was definitely right there five seconds ago.
Common Mistakes and How to Fix Them
Fingerprints on the Clay
Fingerprints are common, especially on white clay. Smooth them gently with a clean fingertip, a silicone tool, or a little rubbing alcohol on a cotton swab after testing carefully. White clay is dramatic; it collects dust like it is auditioning for a cleaning commercial.
Weak Eye Pin
If the eye pin feels loose after baking, remove it carefully, add a strong glue suitable for jewelry, and reinsert it. For future charms, embed the eye pin deeper or create a small clay cap over the wire end before baking.
Uneven Eyes
Uneven panda eyes are not a disaster. In fact, slightly asymmetrical features often make handmade charms more expressive. If it bothers you, gently remove the patches before baking and reshape them. If it is already baked, paint can help balance the expression.
Dust on White Clay
White clay attracts lint with supernatural commitment. Wash your hands, wipe the work surface, and condition light colors before dark colors. If needed, lightly clean the baked piece before sealing.
Why Handmade Polymer Clay Charms Feel So Special
A store-bought charm can be cute, but a handmade polymer clay charm carries a tiny story. You remember the moment you rolled the first ball, the exact second one ear fell off, and the quiet triumph of seeing the finished panda cool on the tray. It becomes more than an accessory. It becomes proof that you made something with your own hands.
That emotional connection is why polymer clay charms continue to be popular among beginners, jewelry makers, miniature artists, and gift crafters. Polymer clay is versatile enough for earrings, beads, figurines, decorative charms, mixed media, and miniature sculptures, which makes it an inviting material for people who want creativity without needing a kiln.
500-Word Experience Section: What This Panda Charm Taught Me After One Month
Making this panda charm after one month felt less like completing a craft project and more like holding a tiny receipt for progress. One month is a funny amount of time. It is long enough to learn things, make mistakes, form habits, and develop opinions about which clay color stains your fingertips the most. It is also short enough that you still feel new, curious, and slightly amazed whenever something turns out better than expected.
The first thing this project taught me is that simple shapes are not automatically easy. A panda looks basic: white circle, black ears, cute eyes, done. But once the clay is in your hands, every little curve matters. If the head is too tall, it looks like a snowman. If the ears are too tiny, it becomes a confused seal. If the eyes are too far apart, the panda suddenly looks like it has seen tomorrow’s bills. That is where patience becomes part of the craft.
The second lesson was that handmade work asks you to slow down. Polymer clay does not reward rushing. When I tried to attach the ears too quickly, they shifted. When I touched the white clay after handling black clay, smudges appeared like tiny shadows of regret. When I kept adjusting the face, I nearly overworked it. The panda basically forced me to breathe, clean my hands, check the shape, and move one step at a time.
I also learned that mistakes are not always failures. One paw was slightly bigger than the other, but it made the panda look like it was waving. The mouth was not perfectly centered, but it added a shy expression. A tiny mark on the bamboo leaf looked accidental at first, then strangely natural. Handmade objects have a way of turning “oops” into “aww,” which is a very generous business model.
Another surprisingly meaningful part was baking the charm. Before curing, the panda felt fragile and temporary. After baking and cooling, it became real. That transformation is one of the most satisfying parts of polymer clay crafting. You take something soft, shape it with care, give it heat, and suddenly it can last. There is a life metaphor in there, but I will not make the panda carry the entire emotional weight of personal development. It is already holding bamboo.
After one month, this charm became a small reminder that creativity grows through repetition. The first project may be uneven. The second may be cleaner. The third might make you loudly announce to nobody in particular, “Wait, I’m actually getting good at this.” That is the magic. You do not need to start as an expert. You only need to start with curiosity, a clean work surface, and the willingness to let a tiny panda teach you patience.
Conclusion: A Small Panda Charm With Big Handmade Energy
Making a panda charm out of polymer clay is a sweet way to celebrate a one-month milestone, practice miniature sculpting, and create something personal enough to keep or gift. The project is beginner-friendly, but it still teaches useful craft skills: conditioning clay, shaping small pieces, attaching details, baking safely, inserting jewelry findings, and finishing a charm so it can survive real use.
The best part is that the finished panda does not need to be perfect. In fact, it should not look factory-made. Its charm comes from the human details: the slightly rounded paws, the carefully placed eye patches, the tiny bamboo stalk, and the feeling that somebody sat down, focused, and made something cheerful from scratch.
So yes, one month here deserved a panda charm. It deserved a tiny handmade mascot with black ears, a soft belly, and the emotional presence of a snack-loving woodland philosopher. And if this little panda inspires another charm, another animal, another bracelet, or a whole army of polymer clay creatures, then congratulations: the hobby has officially found you.